GraalVM Native Image on Windows 10
Steps for Installation and Running Basic Demos
-
Install the Windows SDK Using Chocolatey:
C:\> choco install -y windows-sdk-10 kb2919442
or
Install the Windows SDK Using Visual Studio Code (see below)
-
Install Visual Studio 2019 16.8.x (Community will work)
-
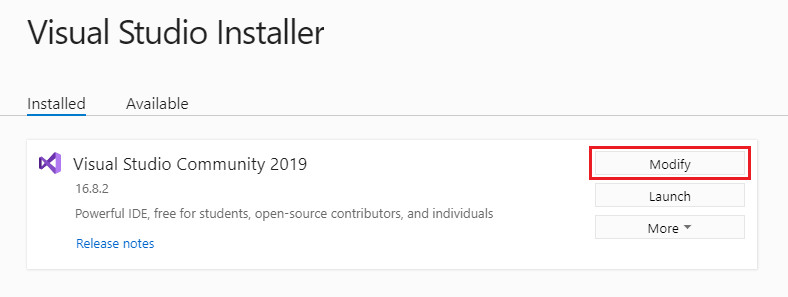
Open the Visual Studio Installer

-
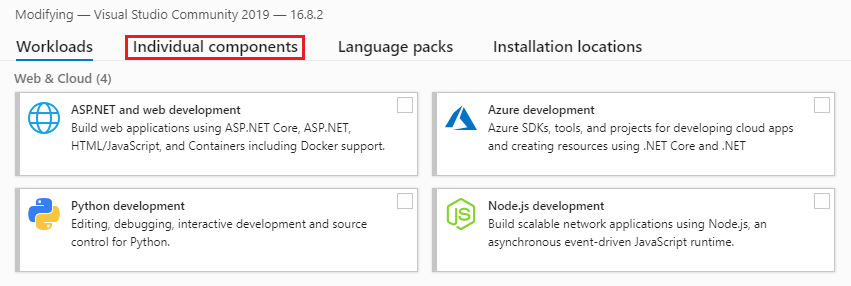
Under the ‘Installed’ tab, click on the ‘Modify’ button and choose ‘Individual Components’
-
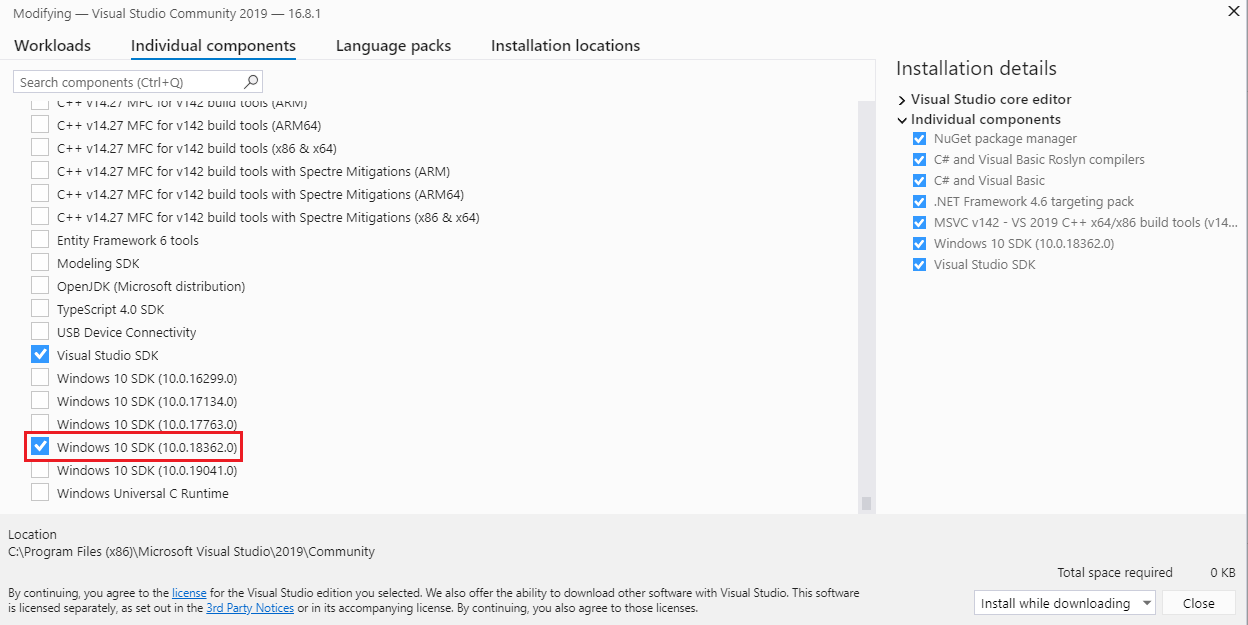
Scroll to the bottom and make certain ‘Windows 10 SDK’ is installed
-
Follow the GraalVM install instructions for Windows
-
Verify the GraalVM install
C:\> java -version
java version 1.8.0_271 Java(TM) SE Runtime Environment (build 1.8.0_271-b09) Java HotSpot(TM) 64-Bit Server VM GraalVM EE 20.3.0 (build 25.271-b09-jvmci-20.3-b06, mixed mode) -
Install the native-image module
C:\> gu -L install .\native-image-installable-svm-svmee-java8-windows-amd64-20.3.0.jar
You may need to use the absolute path to gu, in this example:
C:\> C:\Progra~1\Java\graalvm-ee-java8-20.3.0\bin\gu install -L path-to-file\native-image-installable-svm-svmee-java8-windows-amd64-20.3.0.jar
-
Check for installed modules
C:\> gu list
ComponentId Version Component name Origin ------------------------------------------------------------------------ js 20.3.0 Graal.js graalvm 20.3.0 GraalVM Core native-image 20.3.0 Native Image -
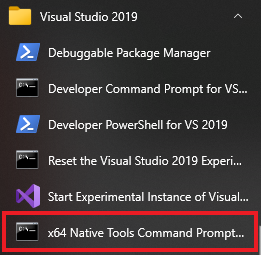
Open a Windows command prompt to start a Visual Studio Dev session:
C:\> “C:\Program Files (x86)\Microsoft Visual Studio\2019\Community\Common7\Tools\vsdevcmd” -arch=amd64
****************************************************************** Visual Studio 2019 Developer Command Prompt v16.8.1 Copyright (c) 2020 Microsoft Corporation ****************************************************************** -
Or launch a Dev command prompt (via Visual Studio 2019):
-
Create a basic application called
HelloWorld.java:public class HelloWorld { public static void main(String[] args) { System.out.println("Hello, GraalVM Native Image!"); } } -
Compile
C:\> javac HelloWorld.java
-
Create a Native Image
C:\> native-image HelloWorld
[helloworld:10284] classlist: 956.55 ms, 0.96 GB [helloworld:10284] (cap): 2,525.43 ms, 0.96 GB [helloworld:10284] setup: 4,266.09 ms, 0.96 GB [helloworld:10284] (clinit): 125.53 ms, 1.19 GB [helloworld:10284] (typeflow): 3,513.99 ms, 1.19 GB [helloworld:10284] (objects): 3,226.40 ms, 1.19 GB [helloworld:10284] (features): 159.53 ms, 1.19 GB [helloworld:10284] analysis: 7,136.97 ms, 1.19 GB [helloworld:10284] universe: 249.78 ms, 1.19 GB [helloworld:10284] (parse): 593.14 ms, 1.67 GB [helloworld:10284] (inline): 818.67 ms, 1.67 GB [helloworld:10284] (compile): 7,087.49 ms, 3.19 GB [helloworld:10284] compile: 8,959.29 ms, 3.19 GB [helloworld:10284] image: 742.99 ms, 3.19 GB [helloworld:10284] write: 236.82 ms, 3.19 GB [helloworld:10284] [total]: 22,670.83 ms, 3.19 GB -
Run the Native Image version
C:\> helloworld
Hello, GraalVM Native Image! -
Measure Startup Time (using PowerShell):
C:\> Measure-Command {“.\helloworld”}
 Days              : 0
 Hours             : 0
 Minutes           : 0
 Seconds           : 0
 Milliseconds      : 3
 Ticks             : 38000
 TotalDays         : 4.39814814814815E-08
 TotalHours        : 1.05555555555556E-06
 TotalMinutes      : 6.33333333333333E-05
 TotalSeconds      : 0.0038
 TotalMilliseconds : 3.8
Micronaut Example
Install Micronaut using Chocolatey:
C:\> choco install -y micronaut
or
Install using instructions here.
Follow the Micronaut/GraalVM tutorial here.
Polyglot Example
- Create a file called
PrettyPrintJSON.java:
 import java.io.*;
 import java.util.stream.*;
 import org.graalvm.polyglot.*;

 public class PrettyPrintJSON {
   public static void main(String[] args) throws java.io.IOException {
     BufferedReader reader = new BufferedReader(new InputStreamReader(System.in));
     String input = reader.lines()
     .collect(Collectors.joining(System.lineSeparator()));
     try (Context context = Context.create("js")) {
       Value parse = context.eval("js", "JSON.parse");
       Value stringify = context.eval("js", "JSON.stringify");
       Value result = stringify.execute(parse.execute(input), null, 2);
       System.out.println(result.asString());
      }
     }
 }
-
Compile the code:
C:\> javac PrettyPrintJSON.java
-
Create a Native Image:
C:\> native-image –language:js –initialize-at-build-time PrettyPrintJSON
-
With Windows, when you are ready to complete the input, press the
Enterkey and then pressCtrl+Zand thenEnteragain to complete the input (see below). -
Run the application:
C:\> prettyprintjson
{"GraalVM":{"description":"Language Abstraction Platform","supports":["combining languages","embedding languages","creating native images"],"languages": 	["Java","JavaScript","Node.js", "Python", "Ruby","R","LLVM"]}}
<enter> CTRL-Z <enter>
{ "GraalVM": { "description": "Language Abstraction Platform", "supports": [ "combining languages", "embedding languages", "creating native images" ], "languages": [ "Java", "JavaScript", "Node.js", "Python", "Ruby", "R", "LLVM" ] } }